XBeam2D Nodes: Difference between revisions
(Created page with "Nodes Nodes can easily be added in the graphical screen. To do this, you have to choose cur_node in the menu bar. In these modus you can add multiple nodes by means of the left mouse button. By placing the node, you will see the coordinates in the right bottom. knopen4 Knopen kunnen willekeurig worden geplaatst, in een vast raster, of op stramienlijnen. Opleggingen zijn knopen die in een bepaalde richting worden vastgezet. Wijzigen van een knoop Wijziging...") |
No edit summary |
||
| Line 1: | Line 1: | ||
Nodes | ===Nodes=== | ||
Nodes can easily be added in the graphical screen. To do this, you have to choose | Nodes can easily be added in the graphical screen. To do this, you have to choose [[File:Cur node.png|28 px|link=http://68.183.11.126/index.php/File:Cur_node.png]]in the menu bar. In these modus you can add multiple nodes by means of the left mouse button. By placing the node, you will see the coordinates in the right bottom. | ||
[[File:XBeam2DNode.png|800px]] | |||
Supports are linked to the nodes. They can be set within the node properties. | |||
===Changing a node=== | |||
Changing a node is possible by clicking on the node by use of the left mouse button, and subsequently choose for properties by clicking on the right mouse button. There is a more easy way, namely a double click on the node. Consequently the following dialog box will be opened. | |||
===Coordinates=== | |||
'''x''' | |||
x-coordinate | |||
Local x-axis see [[Local coordinate system]] | |||
===Table Nodes=== | |||
Nodes can also be added / changed in the table Nodes. It does not matter. It is also possible to change in between graphical input and numerical input via tables. | |||
[[File:XBeam2DNodeTable.png|800px]] | |||
Revision as of 11:48, 31 August 2022
Nodes
Nodes can easily be added in the graphical screen. To do this, you have to choose ![]() in the menu bar. In these modus you can add multiple nodes by means of the left mouse button. By placing the node, you will see the coordinates in the right bottom.
in the menu bar. In these modus you can add multiple nodes by means of the left mouse button. By placing the node, you will see the coordinates in the right bottom.

Supports are linked to the nodes. They can be set within the node properties.
Changing a node
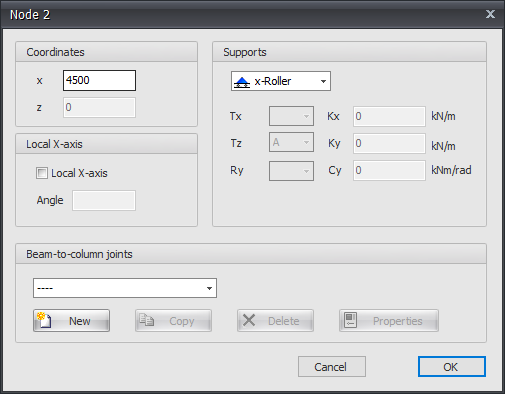
Changing a node is possible by clicking on the node by use of the left mouse button, and subsequently choose for properties by clicking on the right mouse button. There is a more easy way, namely a double click on the node. Consequently the following dialog box will be opened.
Coordinates
x
x-coordinate
Local x-axis see Local coordinate system
Table Nodes
Nodes can also be added / changed in the table Nodes. It does not matter. It is also possible to change in between graphical input and numerical input via tables.
